Today we will discuss the core concepts of FileAgo 😎 . In a nutshell, FileAgo is just like any other file management software, but in order to fully utilize its potential, it is essential that the user understands the core concepts and thought process behind it.
Users
In order to access and store files in FileAgo, you will need a user account.
At the time of installation, admin user is created automatically by the system. This is the global administrator account, and can be used to create further users and groups, assign disk space and so on.
The admin user can grant administrator privileges to other users, allowing them to do all actions which the global administrator user account can.
Groups
Multiple users who need to collaborate and share files among each other can be placed into the same group. A user can be a member of multiple groups (for e.g., John can be a member of both Sales and Marketing group).
Groups are managed by its Group Admins who can add or remove more users to the group, and also assign permissions to restrict their access.
All files uploaded into a group’s workspace is owned by that group (and not by the user who uploaded it).
Workspace
The user’s home page where he/she can upload files is called Workspace. When a user logs into FileAgo, the user is presented with his personal workspace. Files belonging to the user are organized into different folders for easy access.
We earlier established that each group has its own dedicated workspace. A user can see all his groups in the Groups menu at the top, and by clicking on any of the group, he will be able to access the group’s workspace and all its files.

A workspace comes with several folders created by default. These are special folders with specific purpose of their own, and can be viewed and accessed on the left sidebar. They cannot be removed or renamed, and exists all throughout the lifetime of a user or group account.
Home
Like the name suggests, this is the home directory of a user or group. All files and folders are created inside this Home folder only. Home folder of a user can only be accessed by that user and no one else. Similarly, Home folder of a group can only be accessed by its group members.
Incoming
The Incoming folder contains all files and folders that were sent to you (or a group) by other users.
A new incoming share will be in pending state at first. The target user or group will have a maximum of 7 days to accept the incoming resource, or else the incoming resource is silently discarded.
Files and folders inside the Incoming folder are owned by the user and takes up space from the disk quota assigned for that user. Keep in mind that incoming shares which are in a pending state does not take any space from the disk quota.
Similarly, for Incoming folder of a group, files and folders inside the Incoming folder are owned by that group and takes up space from the disk quota assigned to it.
Favorites
For quick access to a file or folder, a user can mark it as a favorite by clicking on the ⭐ icon alongside the name of the resource.
Such files and folders which have been marked as a favorite can be quickly accessed from the Favorites folder.
The Favorites folder of the user workspace will list the user’s own files which has been marked as favorite. In order to access files of a group which the user marked as favorite, he/she will have to switch to that group’s workspace first, and then access the Favorite folder inside it.
Shared with you (or Shared with this group)
This folder contains the list of files and folders which was shared with this user by other users (more on sharing and collaboration later). In case of group workspace, the name of this folder will be Shared with this group.
Private shares
Private shares contains a list of files and folders owned by the user or group which has been shared with other users or groups.
This is the place to check to quickly find out which all resources have been shared with other users and groups.
Public shares
It is possible to share files and folders of a user or group with external users as well by creating a public share. Those files and folders which has been shared with external users will appear in Public shares folder.
Trash
When a file or folder is deleted, it is moved to the Trash folder. It is possible to restore items from the Trash folder back to inside Home folder within 30 days of deletion. The resources will be automatically removed forever after 30 days from Trash.
One thing to keep in mind is that files and folders inside Trash does not take up any space from the allotted disk quota for that user or group. However, when a file or folder is restored back to Home folder, the size of the resource is added to the used disk quota of the user/group (as expected).
Tags
Files and folders can be associated with 🏷 Tags. There is no specific naming convention when it comes to tags. They are merely identifiers which you would use to differentiate between resources.
A tag consists of a name and a class (tag color). When a user creates a tag in his personal workspace, that tag is owned by the user itself. However, if a tag is created by a user in a group’s workspace, that tag will be owned by the group.
Note that a Group Admin can restrict other member’s ability to delete tags in a group.
File sharing and collaboration
FileAgo has support for file sharing and collaboration built to its core. When a user tries to share a file or folder in FileAgo, the user is confronted with 3 choices:
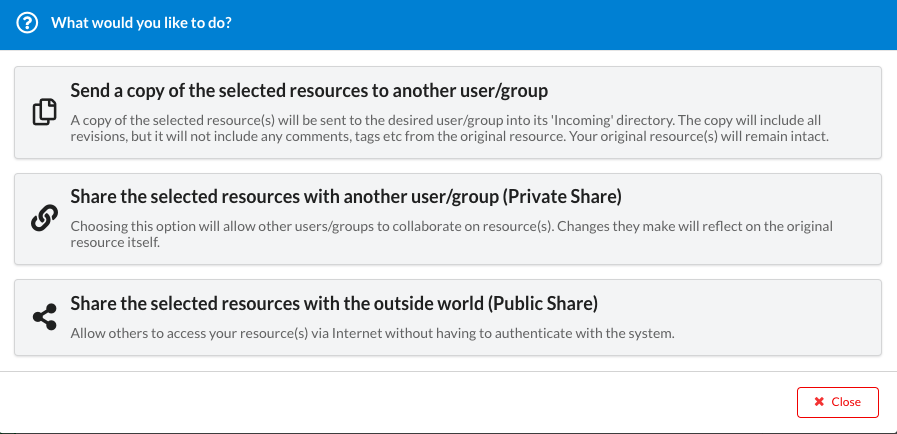
1. Send a copy of the selected resources to another user/group
If the user proceeds with this option, then a copy of the resource (files or folders) will be made available in the target user/group’s Incoming folder. The target user/group will have to accept the incoming share within 7 days or else the incoming share will expire automatically.
The main point to note is that the original resource is not shared with the target user/group. Instead, a copy of the resource is shared. If the resource is a file, then that copy will contain all previous revisions as well.
However, if the user is looking to collaborate with others, then creating a Private Share on the resource is the best way forward.
2. Share the selected resources with another user/group (Private Share)
If the user proceeds with this option, then the original resource is shared with the target user/group. The target user/group will be able to see the resource under Shared with you folder, and based on the permissions allowed, the target user/group members will be able to read, write or even delete the shared resource.
This is the best way to collaborate with others. For e.g., you can share a file or folder with other users or groups as private share, and from there on, all future changes in the file or folder will also be visible to the target users or groups.
3. Share the selected resources with the outside world (Public Share)
There will be times when a file or folder needs to be accessed by someone who is not part of the organization. Public Share comes to the rescue here.
If the user proceeds with this option, he/she will be asked to enter the email addresses of the external users. Notifications will be sent to those email addresses, along with a specially crafted URL which they can use to access the resource directly without any login process.
If configured, a public share can expire automatically on a mentioned date, after which the URL will not work for the public user.
With the core concepts of FileAgo now out of the way, I will explain the permission model in my next blog post. 👍